Follow our step-by-step guide for fitting a Suffolk Latch to a ledge & brace door. This guide can also be used for fitting a Gate Latch to a shed, gate or an external door.
1. Preparation
Before starting, you will need to confirm which way your door opens. Does it swing into or out of the room when opened? A Suffolk Latch is designed for opening a door from both sides, but please be aware that the latch bar parts and the handle with thumb lever can only be fitted to certain sides of the door.
Important: The handle with the thumb lever has to be fitted to the side of the door that opens away from you, and the latch bar and keeper are fitted to the side of the door that opens towards you.
If you have a cupboard door, where access is only possible from one side, it would be best to fit a Latch Set (this is essentially the back end of a Suffolk Latch with only the latch bar parts).
2. Parts Checklist

- Thumb Latch Handle With Bar
- Latch Bar
- Knock-In Staple?Screw-On Staple
- Keeper
Please note: You need to choose whether you are going to use the knock-in staple OR the screw-on staple. Do not use both. The knock-in staple is the most traditional part for keeping the latch bar in place, however, you will need absolute accuracy when fitting it. For this reason, most people prefer to use the screw-on staple.
Now, let's fit this latch!
3. Marking Out

You first need to decide where your Suffolk Latch is going to sit on your door. Usually, this is 130cm from the bottom of the door, but this is not a rule. It is best to fit the latch at a height most suitable for your door and personal preferences.
Once you have decided upon the height for fixing the latch, you will need to mark the points on the door for creating the slot that will allow the latch bar to be raised and lowered.
- First, draw a faint vertical line in pencil, 50mm in from the door edge (please note: 50mm is a standard guide and can be altered according to your specific door/door jam specifications)
- Draw a horizontal line intersecting the vertical line at the point where you want the thumb part of the latch to sit.
- Then draw a second horizontal line 30mm up from the first line - this will be the upper and lower limit of the slot you will need to create.
Helpful Tips:
- The latch should be at a height that is comfortable - you don't want to be reaching up or bending down to open the door.
- It is generally good practice to have all hinges and latches on the doors in your home at the same levels. If you have other latches, fit your new latch at the same height as the others.
- The 50mm measurement from the door edge is an absolute minimum - please adjust according to your door/door jam specifications.
4. Creating The Slot

Helpful Tip: A router is neat and fast. Cut the slot in three equal passes and remember to clamp a piece of wood on the other side of the slot to prevent any breakout.
If you don't have a router you can use a 10mm drill. Create a a line of holes along the marked out area and drill the holes. Then use a round rasp and carefully join up the holes to create a slot.
5. Fixing The Handle & Bar

Now you can carefully pass the bar through the the slot that you have just created.Lower the handle so that the bar sits on the bottom of the slot and is at 90 degrees to the door front when looking at it from the side.
Once you are happy that the handle is in the correct position, mark the holes with a pencil then remove the handle. Create pilot holes and then screw the latch handle in place.
Helpful Tip: Slotted dome head screws can be hard to fit, especially if you are screwing into an oak door. Use a conventional pozi drive screw to create pilot holes first. It is also important to use a screwdriver where the driver blade properly fits into the screw slot, otherwise it can leave a sharp burr.
Another helpful tip, passed on by one of our customers, is to rub a little beeswax or candle wax onto the screw thread before fitting - thanks John!
6. Fitting The Latch Bar
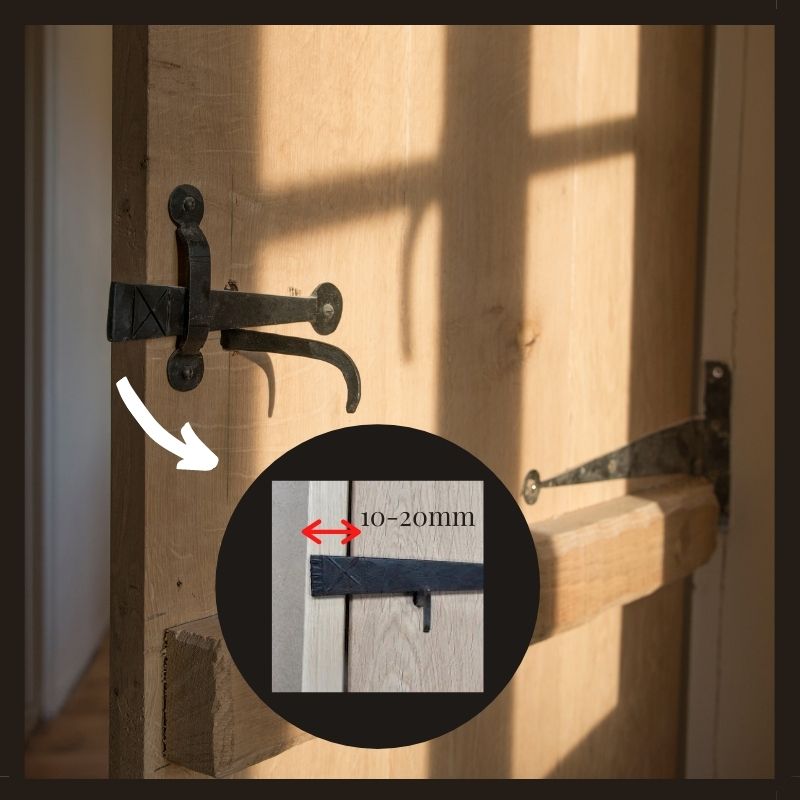
- Lay the latch bar over the lever on the reverse side of the latch, allowing for about a 10-20mm overhang from where the keeper will be finally fixed. You may need more or less than this overhang in some instances, depending upon your door configuration.
- The latch bar should be horizontal to the the floor.
- When you are happy that it is in the correct position, mark out the hole.
- Create a pilot hole with a pozi drive screw, then reposition the bar and fix in place with a slotted woodscrew. The screw should not be fully tightened - back the screw off, to allow free movement, but not too much as to create a sloppy fit.
7. Fitting the Staple

With the lever and latch bar now fixed, it is time to fit the staple. The staple is designed to keep the bar against the door and to hold it in place for it to neatly slot in and out of the keeper when the door is opened and closed.
Knock-in Staple Fitting:
A knock-in staple is the traditional part used to keep a latch bar in place.
- Offer the staple up to the latch bar, making sure it is upright and straight. Give it a firm tap with a hammer, leaving two small indentations.
- Using a small drill (4-5mm in diameter) drill two pilot holes - this will help with knocking the staple into hard material such as oak and also prevent the timber from splitting.
- Fit the staple into the pre-drilled holes and hammer in fully. If you are fixing to a ledge or brace, the spikes will not go through to the other side, but if you are fitting to the thinner part of the door, knock through and then bend the protruding spikes over and hammer down.
Helpful Tip: If you don't want the spikes to show on other side of the door, trim the ends with a saw. Fill the pilot holes with PVA glue to help keep the staple in place. This maintains the traditional look without the unsightly knocked over spikes showing on the reverse side of the door.
Screw-On Staple Fitting:
A screw-on staple is easier to fit and offers a more pleasing decorative touch. Most people now choose to fit their Suffolk Latch with a screw-on staple.
- Offer the staple to the latch bar - centre it between the edge of the door and the pre-cut slot.
- Mark the screw holes with a pencil and remove.
- Drill pilot holes.
- Screw in place with wood screws.
8. And Finally: Fitting The Keeper

The final part of your Suffolk Latch is the the keeper. Although this is an easy-to-fit part, you want to ensure you fit it properly so that you get that reassuring clunk when the latch is closed. Each of your doors will be slightly different and each Suffolk Latch is individually hand-made, therefore you will need to measure carefully to get the keeper in the right place.
- Close the door and make sure the latch bar is resting against the door surround.
- With a pencil, draw a faint line on the underside of the latch bar. This line indicates the inside edge of where the latch bar will fall into the keeper.
- Drill a small pilot hole just under the line and the correct distance in from the edge.
- Carefully knock the keeper into the frame and screw into place. It is important to note that there is a degree of license at this point, you can tap the keeper up, down, left and right until you have got it in exactly the right position.
- When you are happy, secure the keeper with one of the screws provided.
And now you have a perfectly fitted Suffolk Latch!

If you have any further questions or queries please drop us a line at: info@suffolklatchcompany.co.uk
Comments


Do you know when the first Suffolk Latch was created? Or the difference between a Norfolk and Suffolk...
Read Article



16 comments
Colin on Jun 28, 2022
Hi. On a batten and brace door can the Suffolk latch either go through the single piece or through the batten. Or can it be installed either way. Regards Colin
Suffolk Latch Company on Mar 14, 2022
Hi Walter, Unfortunately, a Suffolk Latch isn’t suitable for double doors and is designed for a single ledge and brace style door.
Walter Siouffi on Mar 14, 2022
Hi. Can I fit this on a double door ?
John A on Jan 10, 2022
Excellent instructions. Good that you emphasise the need to predrill and pilot with a pozidrive screw before finally fitting the slotted round head screws. One useful tip to ease things and reduce the risk of splitting is to rub a little beeswax or candle wax on the screw thread before finally fitting.
Dan Theobald on May 02, 2019
Had mine from you ten years ago could do with new coating putting them could you recommend what to use please
-
1
-
2
-
3
-
4
Next »